#kerriegurney #littlebirdiecrafts
Hi Everyone Kerrie back with another mixed media project for Little Birdie Crafts Blog
This project is an upcycle of my daughters violin which she hasn't used for many years. I had upcycled as a decor piece to have on display in her bedroom as a reminder of her playing days but as she is now all grown up and has updated her room, it no longer had a place in there and as I am a bit of a hoarder I have had it stashed away to revamp one day and that day has come.

See below for my tutorial

First up after removing all the old embellishments I painted the whole Violin with White Gesso

Next i created some flourish embellishments using Sculpture Paste in a Silicone Mold, I leave these over night to dry.
TIP; create them ahead of time so that you have some on hand for when needed.

I then added some texture using Stencil and Mixed Media Paste

when everything was dry I used Gel Medium to adhere all my handmade burlap and paper flowers, sisal fibre and flourish embellishments to the Violin
I love the texture that the Burlap flowers and Sisal Fibre bring to a project.
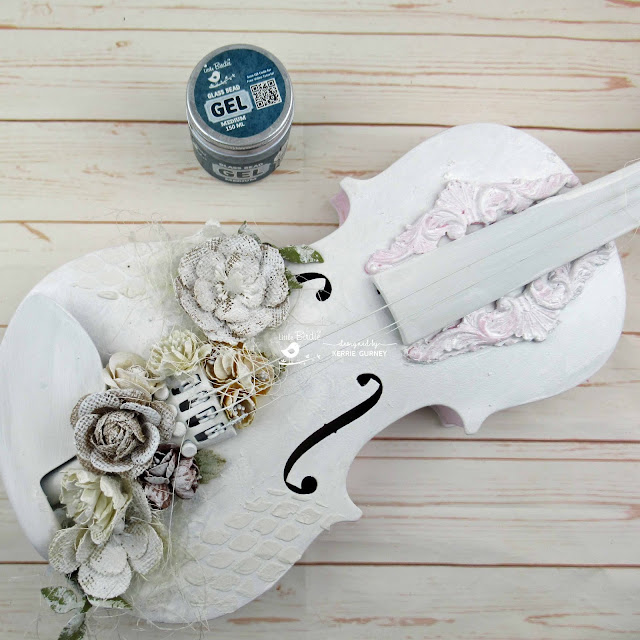
I then painted over everything with White Gesso and then added some more texture by adding Glass Bead Gel Medium randomly around my flowers

Then it was time to add some colour, I used Color Splash Sprays to colour. Starting with Paprika

I then added a splash of Gold Rush Color Splash Spray

Next Ocean Mist Color Splash Spray

I then added some Lemon Zing Color Splash Spray

and lastly a spritz of my own mix, Ocean Mist with Lemon Zing and Mica Powder for a little shine
TIP; Dry the colours off before adding the next colour using a heat tool this helps the colours from getting muddy.

It is so much fun to create your own Color Spray colours, you never know exactly what you are going to get but it is fun seeing what colours you can create and also helps when you don't have the colour you need for your project.

I added a swipe of Sailing Sky Chalk Paint to add some highlights to my flowers and the edge of the Violin
Don't you just love how rich this is looking

I added more layers of all the Color Splash Spray colours until I reached the depth of colour I wanted continuing to dry off between layers of colour.


To finish off I used my finger to rub on Rich Gold Metallic Wax onto the texture paste to enhance to pattern and to the Flourishes and also to the edges of the Violin

When I applied the Gesso I did it quite messily and you can now see how that also adds texture to the base of the Violin.


the Little Birdie Crafts Mixed Media Mediums I have used along with Burlap and Papers Flowers

This project is an upcycle of my daughters violin which she hasn't used for many years. I had upcycled as a decor piece to have on display in her bedroom as a reminder of her playing days but as she is now all grown up and has updated her room, it no longer had a place in there and as I am a bit of a hoarder I have had it stashed away to revamp one day and that day has come.

See below for my tutorial

First up after removing all the old embellishments I painted the whole Violin with White Gesso

Next i created some flourish embellishments using Sculpture Paste in a Silicone Mold, I leave these over night to dry.
TIP; create them ahead of time so that you have some on hand for when needed.

I then added some texture using Stencil and Mixed Media Paste

when everything was dry I used Gel Medium to adhere all my handmade burlap and paper flowers, sisal fibre and flourish embellishments to the Violin
I love the texture that the Burlap flowers and Sisal Fibre bring to a project.

I then painted over everything with White Gesso and then added some more texture by adding Glass Bead Gel Medium randomly around my flowers

Then it was time to add some colour, I used Color Splash Sprays to colour. Starting with Paprika
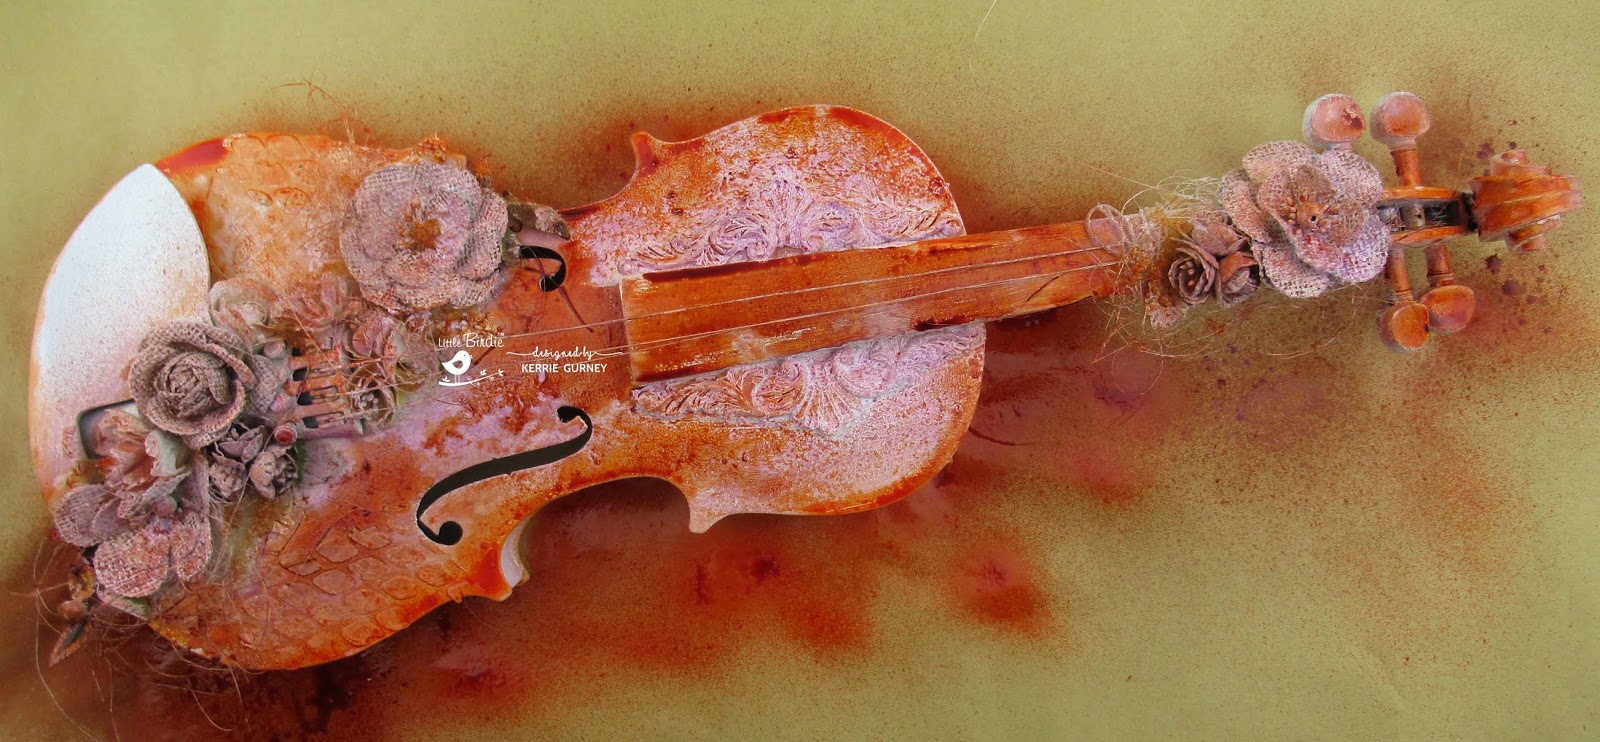
I then added a splash of Gold Rush Color Splash Spray

Next Ocean Mist Color Splash Spray

I then added some Lemon Zing Color Splash Spray

and lastly a spritz of my own mix, Ocean Mist with Lemon Zing and Mica Powder for a little shine
TIP; Dry the colours off before adding the next colour using a heat tool this helps the colours from getting muddy.

It is so much fun to create your own Color Spray colours, you never know exactly what you are going to get but it is fun seeing what colours you can create and also helps when you don't have the colour you need for your project.

I added a swipe of Sailing Sky Chalk Paint to add some highlights to my flowers and the edge of the Violin
Don't you just love how rich this is looking

I added more layers of all the Color Splash Spray colours until I reached the depth of colour I wanted continuing to dry off between layers of colour.

I swiped on some Gel Medium randomly and added a sprinkling of Gold Micro Beads to add more texture to my piece.

To finish off I used my finger to rub on Rich Gold Metallic Wax onto the texture paste to enhance to pattern and to the Flourishes and also to the edges of the Violin

When I applied the Gesso I did it quite messily and you can now see how that also adds texture to the base of the Violin.

I left the embossed strips of cardstock I had on the Violin when I upcycled it last time as I knew they would add fabulous texture to my finished piece.

Here are some close ups of the finished Violin, I just so happy with the end result, I love how all the colours and the textures.


the Little Birdie Crafts Mixed Media Mediums I have used along with Burlap and Papers Flowers

If you would like to see what the violin looked like before this upcycle click here
Thanks for stopping by I hope you have enjoyed my tutorial,

please if you don't already follow Little Birdie Crafts on Facebook, Instagram and of course their Blog
along with the Little Birdie Crafts Cafe Facebook Group
for fabulous tutorials from all the Design Team
Happy Creating


 Posts
Posts


